Deeplinks with Auth and Backstack Management on Android
The new Jetpack Navigation library brought a ton of great features to the Android platform. Now there’s finally an easy way to switch from fragment to fragment without having to manually set up each transition. Even deep linking is made easier through the use of navigation graphs!
Often, you’ll find your deep links will need to sit behind some sort of authentication screen before actually showing the screen to the user. Jetpack Navigation can help make this easy as well, though the documentation is a bit lacking on how you should set this up. Skip to the end for the full solution or follow along if you want to learn more about how it all works.
Getting Started:
Below is the layout of the app we’ll be adding deep links to. The code for this can be found here: https://github.com/jmccormack200/deeplinksdemo/tree/start
The nav graph looks like this:

This is a pretty simple layout. We have a login screen that navigates to a dashboard screen upon success. Once logged in, we have three different screens the user can navigate to.
We want to set up a deep link to Screen 1, but want to ensure the user is logged in before they can do that.
Here’s the starting nav graph:
Add a deep link:
Adding a deep link could not be easier in jetpack navigation. All we have to do is add a deep link XML tag to the navigation graph and then inform our manifest of the nav graph. To add one for screen one we could do something like this:
And then in the manifest:
Some notes:
1. The “URI” should be a domain name you own.
2. The user will be able to open the URI in either the app or the web browser, so its a good idea to make sure it’s valid in both cases.
3. Leaving out the “Http” or “https” section of the URI ensures both will match. So www.jdmccormack.com will match to both https://www.jdmccormack.com and http://www.jdmccormack.com
4. Make sure to add this line to the manifest: <nav-graph android:value=”@navigation/navigation” />
That’s all we have to do to enable deep linking! Simple.
Testing Deep Links:
Android Studio also provides a handy way to test deep links. Start by clicking “Edit Configurations” next to “Run” in the toolbar:

Then click the plus sign in the top left of the window to add a new configuration. Make sure to select the right module. Then under “Launch Options” select URL and enter the URL you chose for the deep link. Make sure to include either “Http://” or “https://” or it won’t work.
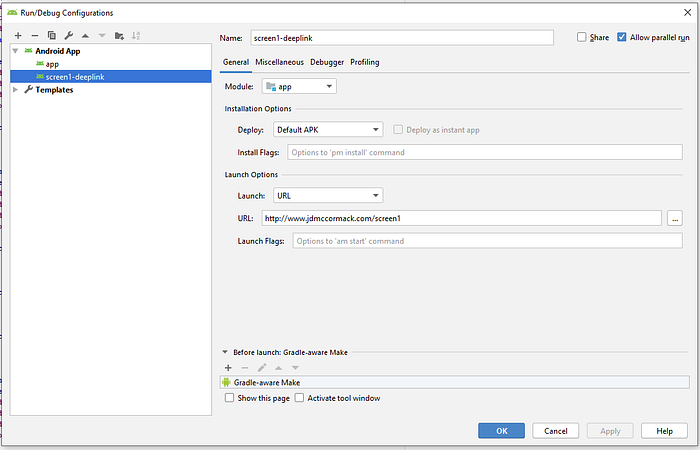
Then click ok and you’re ready to run it.
Our First Attempt
When you hit run it should look like the following:

But what we want is to ensure the user is logged in before they get to a screen. For this tutorial, we’ve implemented a really simple (read bad) implementation of a login service that will check if the user is not logged in. If they aren’t, we’ll navigate to the login screen first before showing them the content.
Adding Authentication:
First, we’ll create a login service:
Next, let’s create a BaseAuthFragment class that ensures screens are authenticated. If they aren’t, we’ll start the LoginFragment with a reference to the current screen’s navigation ID so it can return after authentication.
Then we’ll check for that ID in the bundle after the login happens successfully and navigate appropriately:
If there is no ID provided, we navigate to the dashboard as usual. If there is an ID then we pop the back stack up to that ID. This will ensure the login fragment isn’t still on the back stack when we navigate.
Now when we run it we get our login screen before we see the screen from our deep link.
Awesome! But wait there’s a problem. Can you guess what it is?

Our back stack isn’t exactly what we want. When we hit back we’ll want to take the user back to Dashboard where they can select which screen to go to. We could do this manually by overriding the back behavior but that will be clunky and error-prone. Luckily Jetpack Navigation has us covered!
Preserving the back stack through nesting graphs:
Turns out this line of the documentation holds the key to what we are trying to do:
As with explicit deep linking, when nesting graphs, the start destination from each level of nesting — that is, the start destination from each
<navigation>element in the hierarchy—is also added to the stack. This means that when a user presses the Back button from a deep link destination, they navigate back up the navigation stack just as though they entered your app from its entry point.
Source: https://developer.android.com/guide/navigation/navigation-deep-link
So all we have to do is create that nesting relationship in the nav graph!
And that’s it! Now we have a deep link that:
- requires authentication
- navigates back to the screen from the deep link
- maintains the proper backstack.
Conclusion
If you want to see the result for yourself, check out the repo I set up here: https://github.com/jmccormack200/deeplinksdemo/tree/solution
The biggest downside to this solution is if you weren’t set up to handle deep links from the beginning of your project, this could amount to a hefty refactor with lots of regression testing to make sure you didn’t break any of the navigation relationships.