Android Architecture Deep Dive — Part 2 — MVVM
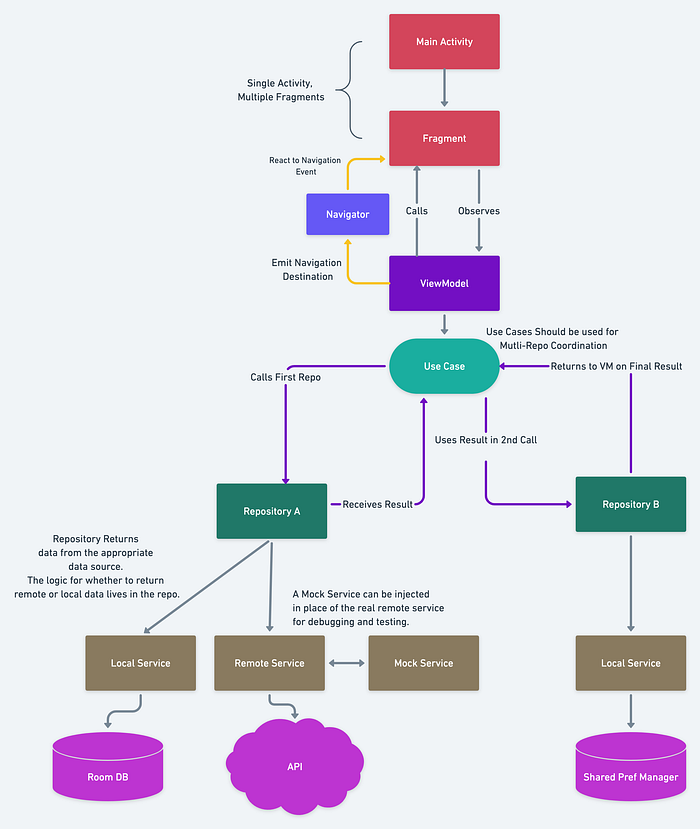
We’ll pick up where we left off by talking about the overall project structure. Now that we agree Multimodule is good and Multirepo is bad, we still need to know how to actually structure the project. Our overall architecture looks like the following layout:

This can look quite complicated at first, especially if you’re not used to seeing an MV* pattern, but let’s break it down.
MVVM
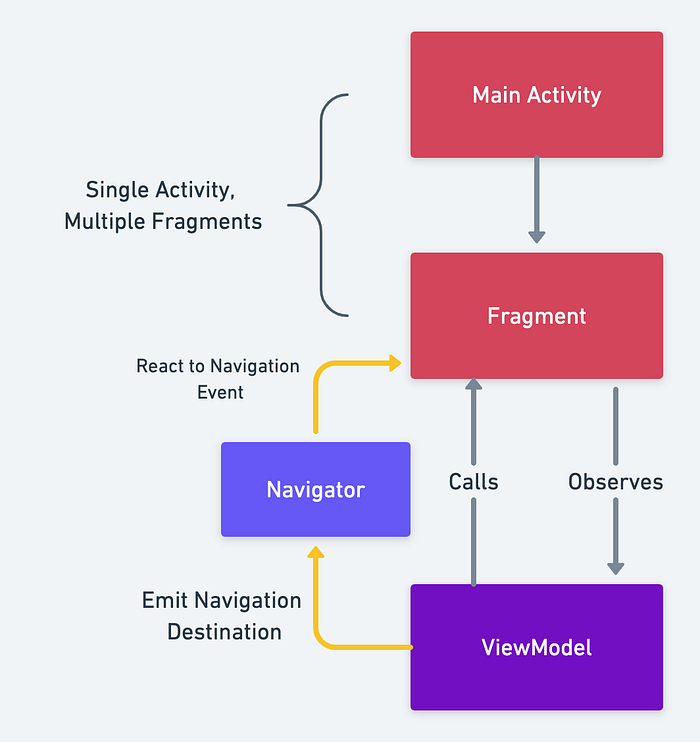
There’s a natural inflection point in the diagram above at the use case layer. The section above is everything that is View specific. Here we have the Fragments, ViewModels, Activities, and the navigation framework for switching between different views. Everything below the use cases falls into the domain/data layer, which we’ll talk about later.

Our projects are almost exclusively single activity now. With the new jetpack components, Google has really taken a stand on this argument. If you want to leverage most of the components they have created, your project should be single activity too. Our Main Activity exists in the “app” module. This Main activity is responsible for starting the first Fragment. In our example project, MainActivity’s only job is to inflate a layout with the navigation host fragment and jetpack navigation takes over from there. You can see the MainActivity here and the corresponding layout here.
The real core of the app will be split between the Fragments and ViewModels. With the creation of the Jetpack component called ViewModel and LiveData, MVVM is a lot easier to implement now than it used to be. You can still use MV-Whatever but its a good idea to consider using the libraries.
View
The MainFragment in the app module is pretty simple. We just have a button to take us into the first module. This could have lived in its own module as well but for simplicity, I’ve included it here. The app is started through the use of Jetpack Navigation. Take a look at the main_navigation file:
We list our main fragment as a <fragment> entry. We also indicate that MainFragment is the start destination of the app at the root entry of the graph.
Now let’s take a look at MainFragment:
There’s some work happening behind the scenes in the BaseFragment that we’ll definitely talk about. But for now, its enough to understand that the layoutResourceId is what will inflate the layout and that obtainViewModel will help up get the appropriate ViewModel for this Fragment.
Once the view is created, we need to do two things: set up the UI listeners and set up the VM observers. When we setup UI listeners we’re telling the view what to do on button presses and text input. Here we use synthetic accessors to get a reference to the item in the view (main_navigateBtn). We set its onClickListener to call a function in the VM. This is an important first step to MVVM: the view should always react to any event by telling the VM what happened. The view should never make a “decision”. It should immediately defer to the VM with no if statements or data transformations in between.
The next step is to configure the VM observers. The VM will not be calling the View directly. Instead, it will emit data to the view that the view can observe. On this screen, the only data emitted is a “Navigate” event. When the VM fires this event the View will see it and navigate to the next screen.
View Model
Now let’s look at things from the ViewModel side. For this case, let’s look at both the MainViewModel and its base class NavigationViewModel.
In MainViewModel we have an internal function that MainFragment can call in its onClickListener. In the base NavigationViewModel, we expose a LiveData for navigation information. This is technically a custom class called LiveNavigationField which we’ll talk about later. For now, just know that it is a LiveData that provides some protection specifically required for Navigating. When the user clicks a button, the VM sees the event and determines what to do next. Here we only have one place to navigate to, so the VM just immediately fires off a Navigation LiveData event to the LandingDestination. Landing Destination is a wrapper around a Jetpack Navigation ID that the VM can use to tell the View where to navigate to. The Fragment is listening for these events so when the VM posts a new one, the fragment sees it and navigates to the new screen.
A key point to notice is that nowhere in the VM do we import MainFragment. The VM should never know anything about the View itself. The VM can only post events that the View can observe. Likewise, the Fragment can’t post events for the VM to observe, it must call public functions on the VM to tell it what happened.
Things to keep in mind
One “Gotcha” with VM’s is that you usually need both a MutableLiveData and A LiveData to properly encapsulate your data:
private val _randomNumber = MutableLiveData<Number>()
val randomNumber: LiveData<Number> = _randomNumber
This is because if you make a MutableLiveData public the View could potentially post data to it too. However, if you just use a normal LiveData than the VM is also prevented from posting data to the channel. Therefore, we typically follow the above workflow where the VM uses a private version called _LiveDataName and then exposes a public LiveDataName that is casted from a mutable to a normal LiveData.
Another important aspect of using VMs lies in the BaseFragment:
/**
 * Fragment extension function for obtaining an [instance] of the view model through ViewModelProviders
 */
@Suppress("UNCHECKED_CAST")
inline fun <reified V : ViewModel> Fragment.obtainViewModel(crossinline instance: () -> V): V {
    val factory = object : ViewModelProvider.Factory {
        override fun <T : ViewModel> create(modelClass: Class<T>): T {
            return instance() as T
        }
    }
    return ViewModelProviders.of(this, factory).get(V::class.java)
}
This is a complicated piece of code, but the idea is simple. Fragments can die for numerous reasons, but we don’t want the data to die with it. ViewModelProviders is a tool from Android that checks to see if a ViewModel has been created already. If it finds the ViewModel it attaches the existing one to the new Fragment. If it doesn’t find an existing one it creates a new one. The code above is a nice extension function to allow for the syntax we saw earlier:
private val viewModel by lazy {
    obtainViewModel {
        MainViewModel()
    }
}
If you’re new to Kotlin you might be unsure of the “lazy” part of that assignment. Basically, lazy waits to create the object until something needs it. If we don’t include that then we try to grab an instance of the ViewModel before the Fragment is truly generated and we get a crash because context is null. By using the lazy qualifier and using the viewModel in “onViewCreated” we guarantee the Fragment is fully formed before we try to get it.
Conclusion
That’s the gist of MVVM. This is obviously a really simple example and we glossed over the complicated aspects of Navigation. We’ll continue on to talk about Navigation, Testing, Use Cases, and the “other side” of the architecture in upcoming articles.
Continue reading with the next entry in the series where we talk about Navigation and Coordinators: https://medium.com/@jdmccormack63/android-architecture-deep-dive-part-3-df27d5b3de3c
